Assignment Creation
The Assignment feature in Blackboard allows students to submit assignments directly to Blackboard. This is useful for collecting student work for grading and for institutional purposes such as signature assignments for aligning program and institutional outcomes.
To create an assignment:

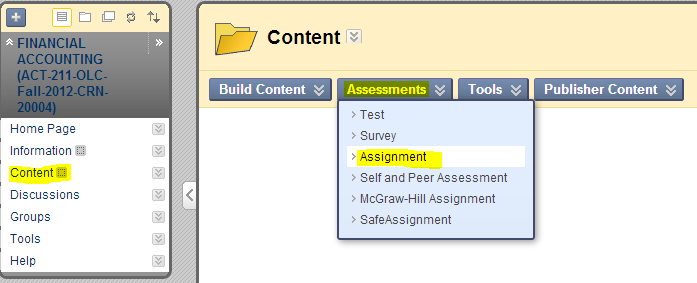
- Go to a content area in your Blackboard course. An example in the default course template is named "Content" and can be seen on the left side of the screen in the navigation pane. Some instructors have renamed this Content link/button to things like Course Documents or Assignments.
- Click the blue button at the top of the screen titled Assessments (if you do not see a blue button, you are not on a content page).
- Choose Assignment on the drop down menu.
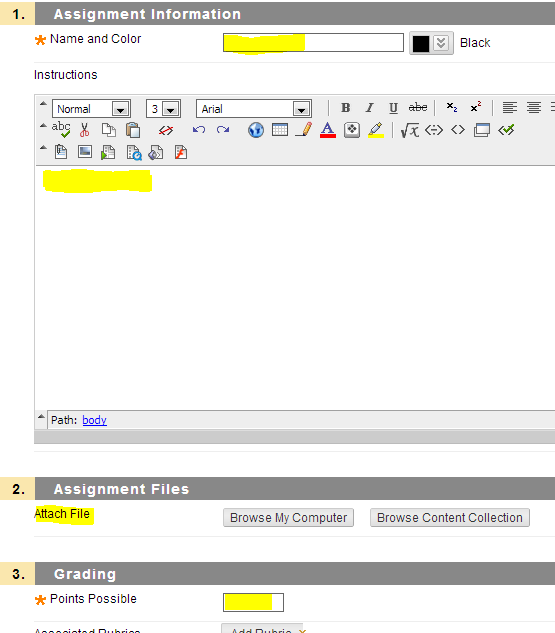
- Give the assignment a name and provide any instructions about the assignment in the Instructions text box. You can also attach documents to this area by clicking the Browse My Computer button.

- Give a point total for the assignment. It is OK to put 0 if you are not including the assignment in the point total for the course or if it is extra credit.
- The remaining items on the page are all optional and do not need to be changed. A best practice however is to change the Number of Attempts option from "Allow single attempt" to "Allow unlimited attempts." This allows the student to submit multiple times if they have made a mistake, however, you as the instructor can decide which one to accept.
- Click the blue Submit button.
The student's submissions can be viewed by going to the Full Grade Center found in the Control Panel on the bottom left side of the screen. A green box with an exclamation mark will show next to the name of students who have submitted something. To view the submission, click the down arrows that appear to the right of the green box and click "Attempt [date]."
